DIY Home Improvements with Achim Flooring

This post was sponsored by Achim Home Décor as part of an Influencer Activation and all opinions expressed in my post are my own.

Who doesn’t love a good home improvement project that is not only affordable, but that can completely change the way your home looks? I recently discovered Achim Home Décor and its easy to use DIY flooring available at Walmart. Until May 1st, 2020 you can also enter for a chance to win a home floor makeover (up to 2,000 sq. ft.) and other great prizes on their website! Head over to achimhomedecor.com

Achim Home Décor makes it easy to completely revamp a room by installing your own flooring without any major construction! In most cases, you can simply place it over your existing flooring with no damage at all. It makes it the perfect and affordable solution for small spaces, rental properties or indecisive people, such as myself, who want to feel out a look before committing to a full blown expensive renovation!

IMG_1280.JPG

I headed to my local Walmart to check out the selection and was super surprised at how gorgeous the styles were! Achim Home Décor now has an entire line of quality tile and wood plank options! We have a bathroom in our basement that has absolutely horrendous tiles but the cost of doing a renovation is much more than we’re looking to spend right now so I think this could be a cost effective, easy and gorgeous solution! Achim Home Décor offers a few different flooring options so you can find the perfect look for any room in your home.

IMG_1278.JPG

Their Nexus Carpet Tiles are 12” x 12” tiles with self adhesive backs that stick to any flat and dry surface. They’re a great option for a mudroom, basement or garage. The colors will hide dirt and wear and tear while making the space look so much more inviting! They also come in mix and match colors so you can create an awesome pattern in any room for an even more custom look!

IMG_1279.jpg

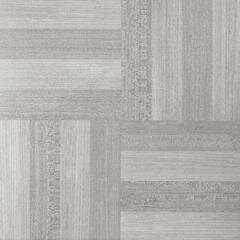
Their Nexus Tiles are by far the best solution, in my opinion, for a kitchen, bathroom, basement or front entry way. You don’t need any glue or adhesive, you simply peel and stick the tiles to any dry and flat surface and you’re done! They come in a lot of different patterns and colors but I loved the black and white and can picture mixing both for a beautiful modern monochrome look in a bathroom! Below are a few of my favorite picks!

IMG_1275.JPG

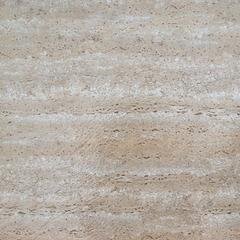
I saved my favorite for last: the Portfolio Vinyl Planks. These resemble a hardwood floor, but just like the other flooring options, are peel and stick so you can completely transform a room on a budget. I would definitely use these in bedrooms, living rooms, dining rooms, home offices or basements! I loved the Silver Spruce color and even in person, it looked just like hardwood!

IMG_1276.JPG

If you’re still wondering how easy it is to install Achim Flooring, I’ve included a video below! It really is an easy and affordable way to completely transform your home! Don’t forget to enter their giveaway for a chance to win a home floor makeover (up to 2,000 sq. ft.) and other great prizes! Click here to head to their site to enter!


DIY Mother's Day Handprint & Footprint Gifts

We LOVE DIY crafts (well I do at least... Zane loves to play with paint - so it's a win-win) and what better time to make one than Mother's Day? All moms LOVE DIY crafts from their kids and even more so from their grandkids! Zane and I got to work and created the most adorable gifts for his Grandma and Great-Grandma this Mother's Day.

DIY NOVELTY TRAY AND PIGGY BANK

Start of with finding the pieces you want to decorate. Make sure to thoroughly clean and let them dry. Some materials are more porous and will need to dry over night. This step is SUPER important. Often ceramic and porcelain products are covered in a film or dirt and the paint won't properly stick unless it's clean. 

Choose your paint colours. We used the paint below and bought a thinner because I didn't want it to go on too thick. 

6A84A5ED-F954-4E18-8170-037B274DB5D2-Facetune-08-05-2018-20-51-37.jpg

Optional: Paint Brush - You'll need one if you decide to write something on the jar or piggy bank (such as the date, your child's name etc.). I also used a thick paint brush to paint on my son's hands and feet. You could also just mix the paint in a bowl and press their hand/foot in it.

Once your tray is clean and dry, map out the design you want. You want to know EXACTLY where you're putting your mini's hand or foot once it's covered in paint because it won't be fun trying to keep them still if they're younger. I recommend doing this project with someone else so that one of you can place the foot or hand in paint and make the print and the other can stop your baby from crawling away covered in paint. 

Follow the directions on your ceramic paint. If you used the same one as I did, let it dry overnight, then bake for 35 mins at 150 degrees. Then it's ready to package and send off!

Tips: Definitely find a place to date your artwork. It's always nice to look back and see when the art project was made. I definitely recommend doing the hand print before the decorating because it's the hardest part. I needed to wash off my son's handprint several times before getting one that was perfect and the rest of the design would have been ruined had I done it first!

IMG-0092-Facetune-08-05-2018-20-42-40.jpg
IMG-0095-Facetune-08-05-2018-20-46-53.jpg
IMG-0093-Facetune-08-05-2018-20-47-04.jpg

Happy Crafting! I would love to see the artwork you create so don't forget to tag me in your posts! @mrsnewmommtl


xox Tovah


DIY Candy Jar for a Sweetie in Your Life

Zane and I have recently been loving DIY crafts (ok mostly me but he'll love having these keepsakes one day :)). With a husband who has everything, it's getting harder and harder to surprise him with little gifts every now and then, so a personalized gift from Zane is always sure to be a hit! With Valentine's day just around the corner, I thought it would be so cute to make my husband a personalized candy jar for his office filled with candy as sweet at him! You could also do variations of this craft by personalizing a candy bowl or a cookie jar and filling it with delicious sweets :)

What we used: 

  • Ceramic candy jar (you can also use a candy bowl or cookie jar)
  • Acrylic paint
  • Paint brush
  • Marking tape (optional)
  • Rubber or latex gloves (optional)

1. Mark the jar with the pattern you want using the marking tape.

2. Choose the colour you want for your hand print, add some paint on a plate and get your mini ready! It helps if you have 2 people coordinating this part :) This is the step where you want to put on your rubber gloves if you've opted to use them because although the paint will wash off your hands, it did not come off my nail polish. Place your baby's hand palm down in the paint and make sure it's well coated. Place your baby's hand flat on the jar to get a perfect print! 

** I recommend doing the hand print before painting the jar because you don't get a print that you like the first time (it took us 4 times), you can use water to wash it off and to start over without worrying about ruining the rest of the design!

3. Paint the rest of your jar however you want! If you are using multiple coats of paint, be sure to wait at least 30 mins between each coat to make sure it dries. We chose to add Zane's initials to the jar and to put the date inside the lid so that we will always know how old he was when he made it!

4. Preheat oven to 350 F

IMG_0849.JPG
IMG_0850.JPG

5. If you used marking tape, remove the marking slowly (if you pull too fast it may remove some paint) and fill in any gaps you may have or uneven edges!

6. Put your jar directly on your oven rack OR on a parchment covered baking sheet and bake for 30-35 mins. 

7. Let cool and then fill with your fave candy or sweets!

My recommendation for doing this craft with young babies: Do it with them only wearing a diaper - it makes cleaning up the mess much easier. Have the craft sitting beside your kitchen sink so that the minute you finish with the print you can wash the paint off of them before they get it anywhere else. This craft was super easy, inexpensive (under $20 total) and I know my husband will love his surprise - and I'm sure his colleagues will too now that's filled with delicious candy :). 

My Fave 5 DIY Gift Ideas for Babies and Toddlers

My fave holiday is just around the corner (and no it's not my fave because of the chocolate.... ok well maybe it's because of the chocolate), but this year I'm loving it so much more because of all the fun crafts I get to do with Zane! There is nothing sweeter than giving someone you love a DIY made by someone else you love! Below are my fave 5 DIY Baby and Toddler Valentine's Day Gift Ideas!

1. Finger Print Key Chain or Necklace

IMG_9911.JPG

I got this idea from The Crafty Crow who originally posted a tutorial for Mother's Day. I changed a few of the steps and decided to make a keychain instead of a necklace because I wasn't sure a bright pink heart necklace would match with my husband's suit every day at work LOL.

What you'll need: 

  • Oven baking clay (in whatever colours you want!)
  • Keychain rings (or a chain or rope if you want to make it into a necklace)
  • Cookie cutters
  • Skewer to poke a hole
  • Rolling pin
  • Baking sheet
IMG_9910.JPG

Directions: 

  1. Take your baking clay and roll it out to the thickness you want (I made mine 1/6 inch thick)
  2. Cut out your shape with a cookie cutter
  3. Grab your mini and press their thumb down in the clay until you get a clear fingerprint impression (this may take a few tries... especially if you have a mover like I do)
  4. Take the skewer to make a hole in the heart (where you want to insert the keychain ring or chain for a necklace)
  5. Place the clay on a baking sheet
  6. Follow baking instructions on the package of the clay
  7. Once cooled, insert your keychain ring and you're done!

2. Footprint Canvas Art

IMG_0074.JPG

I found this idea on The Mommy Nichols. She's known for her awesome DIY projects and easy recipes... and this craft is no exception. With our little ones growing up so quickly, what better keepsake than a piece of art with their itty bitty tiny feet? I love how easy, quick and beautiful this canvas craft is! Click here to visit The Mommy Nichols website and get this craft started! Follow her on Instagram for more awesome craft ideas all year long!

3. Abstract Art

DIY Abstract Art.jpg
DIY Abstract 2.jpg

This is such an easy craft to do and your little one, no matter what their age, will have SO much fun doing it! You can choose whatever colours you want and the fact that it makes no mess is a bonus! It's a keepsake that you can hang anywhere in your home! Click here to see my blog post about it. 

4. Love Bug Finger Print Art

LoveBugs.jpg

I got this idea from I Heart Arts and Crafts. I think it's such a cute craft for older kids who know how to use scissors and can use glue. This is such a sweet idea and I love that your children will be able to do it all on their own. I recommend using washable paint or protecting your arts & craft area with plastic so that once they dip their fingers in paint you don't have the paint everywhere :) Click here to visit I Heart Arts and Crafts to see the full tutorial for this DIY.

5. Kid Made Jewelry Dish

jewelrydish1.jpg

This last idea came from Inner Child Fun. This is definitely a craft for your older kids (unless you want to do it yourself lol). It requires very few things to buy and it's something that any Mom or Grandma will love. Your kids will have so much fun doing it and will love that their mom can use it every day! You can also do variations of this craft depending on who the gift is for - you can make a ring bowl, a candy bowl, decorative bowl for your home... the possibilities are endless! Click here to visit Inner Child Fun to make your own jewelry dish!  

I can't wait to see which you end up trying! Make sure to tag me in your posts on Instagram so I can see your finish product :)

Healthy Homemade Dog Treats!

IMG_9860.JPG

Rambo has officially joined the list of men in my life who are picky eaters (lucky me), so I decided that instead of spending money buying treats that he hates, I would make him some delicious homemade cookies! It also gives me peace of mind knowing EXACTLY what's going in them... and the fact that he loved them didn't hurt either! I wish I could say that finding a great recipe was easy... but it wasn't. I had 3 failed attempts before finding 2 that he loved, but I guess good things don't always come easy! I hope your little fur baby enjoys them as much as Rambo did! I made him Crunchy Ginger Cookies and Mini Muffins!

Scroll to the bottom for links to my fave cookie jars!

Crunchy Ginger Cookies

Ingredients:

  • 2 cups whole wheat non-bleached flour
  • 1/2 cup large flake oats
  • 1 tbs of ground ginger
  • 3/4 cup no salt added chicken broth
  • 1 egg
  • 1/4 cup vegetable oil
IMG_9862.JPG

Instructions:

  1. Preheat oven to 375 F and grease baking sheet
  2. In a large bowl combine whole wheat flour, large flake oats and ginger
  3. In a small bowl combine chicken broth, egg and oil
  4. Add wet ingredients to dry ingredients and mix until well blended
  5. On a lightly floured surface roll out dough until 1/4 inch thick and use cookie cutters of your choice to cut out treats.
  6. Put treats on baking sheet and bake 25 mins.

Mini Pup Muffins

Ingredients

  • 1 Apple or 1 cup of Apple Sauce
  • 1 Medium Carrot
  • 1 ripe Banana
  • 2 eggs
  • 1/4 cup of butter
  • 1 1/4 cup Unbleached Flour
  • 1.5 tsp baking powder
IMG_9864.JPG

Instructions

  1. Preheat oven to 350F and grease muffin tins (large or small)
  2. Peel and cut carrot and apple and steam until soft. If using applesauce, only steam carrots.
  3. In large bowl, mash banana 
  4. Add eggs and butter
  5. Puree the cooked apple and carrot
  6. Add apple and carrot to the other wet ingredients and beat until there are no lumps
  7. Add the flour and baking powder to the wet ingredients and beat for 2 minute (until smooth)
  8. Fill greased muffin tin 1/2 way full with batter.
  9. Bake for 15 mins if making mini muffins, and 20-25 mins if making regular sized muffins, or until wooden tooth pick comes out clean.
IMG_9865.JPG

I would love to see pics of your fur babies enjoying these treats so please tag me in your pics on Instagram :) @mrsnewmommtl

Here are some decorative that I think you'll love - perfect for treats, cookies, baking goods and storage! Click the links below OR visit my online store to see them all by clicking here.

Stackable 3 Tier Cookie Jar 

Set of 3 Chalkboard Glass Canister Jars 

Chalk board labels - turn any jar into a chalkboard! 

Set of 5 Airtight Glass Canisters 

Glass Apothecary Jars

    Zane's Room - My First DIY Success!

    If you follow my Instagram stories, then you know I am not talented when it comes to DIY projects. Most of them just give my husband a reason to laugh or get upset... his reaction depends on how much money I wasted lol. My DIY failures extend to the kitchen (I can't cook and once gave myself salmonella poisoning), beauty (I once waxed off too much of my eyebrows and had a lopsided face for a month), and until recently included arts and crafts. I am SO proud to announce that for the FIRST TIME EVER, I had a DIY success!

    I had such a bad pregnancy that I never really got around to fully decorating Zane's room because it was uncomfortable to breathe, let alone start hanging things on my walls. So now that my munchkin is here, I decided to spruce up his room a bit! 

    I bought some wood letters from Michael's Crafts and spray painted them a dark grey to match his room. (this part was a little bit of a failure because I almost sprayed myself in the face and put way too much on each letter so it took a few days to dry instead of 1 hour).... but the end result was great!

    I then ordered grey triangle wall decals from Indigo to put around the letters! I opted for decals instead of painting the wall because I figured if I messed it up (there was a 90% chance that would happen), then I could easily take them off before my husband got home to avoid being ridiculed. Scroll through the pics below to see the final product!

    Voila! A fully decorated wall for under $60!